
When we redesigned HourStack, we also redesigned how the “logged time” feature in entries works.
Unfortunately, the new interaction meant that it wasn’t possible to enter logged time and to complete the entry at the same time it was created.
Some people create entries after the work is completed and, rather than using a timer, will log the time after the fact.
With this in mind, we redesigned the logged time interaction so that now you can enter logged time directly at any time, run the timer, and mark and entry as complete or incomplete.
You can even enter logged time and complete the entry at the same time as it was created.
How to Add Logged Time to Your Entries
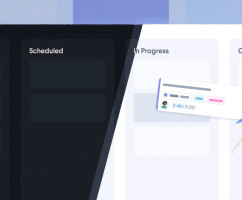
Adding "logged time" to a historic, in progress, or future entry is easy. Simply click the entry to open it, and enter your "logged time" in the Logged box.
Once you've saved the entry, you'll see the changes reflected in your calendar view.
If you'd like to add logged time, and complete the entry at the same time, no problem! Simply click the green checkbox circle next to Logged and your entry will be marked as complete.
HourStack's Product Roadmap Is in Your Hands
As many of you already know, HourStack's product changes are largely customer-driven. This means you actually have an opportunity to help guide the direction of the updates. If you have suggestions for improvements, be sure to email us at support@hourstack.com. We'd love to hear from you.
Updated September 21, 2022 in Product Updates